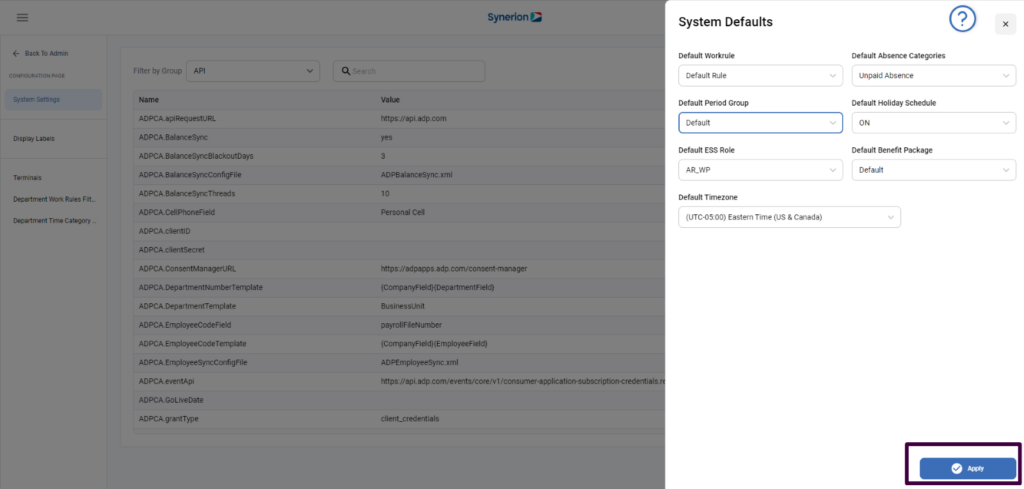
System Settings page on Bolt allows user to view the different groups and their associated system settings. User can also view and edit the system defaults.
NOTE: On Bolt,
- User cannot add, rename, or delete a Group.
- User cannot add or delete System Settings
View groups and their associated system settings
User can view the groups and linked system settings by selecting the group from filter “Filter by Group”. By-default, “All” groups is selected. To select the group,
- Click on Admin icon
- Click on “Configuration page” option available under Admin menu
- Click on “System Settings” option under configuration page menu
- Go to “Filter by Group” drop-down. By-default, it shows All
- Select a different group from the drop-down list
- It will refresh the grid and shows the system settings based on the selected group.
Search System Settings
On Bolt, user can search for a system setting by entering the search in search text box.
User can search by
- System setting’s name
- Value, or
- Description
To search,
- Click on Admin icon
- Click on “Configuration page” option available under Admin menu
- Click on “System Settings” option under configuration page menu
- Enter text in the Search text box. Text should be either name, value, or description
- It will start filtering the system setting based on the text user is entering.
Edit System Settings
User can edit the system settings’ name and description. To edit the system settings,
- Click on Admin icon
- Click on “Configuration page” option available under Admin menu
- Click on “System Settings” option under configuration page menu
- Under Actions column, click on 3-dot icon (..) for the setting user wants to edit
- Click on “Edit” option
- Clicking on “Edit” option will show an Edit pop up
- User can enter edit a value or description
- Click on Save once edits are done
- It will dismiss the dialog and show the success toast message with updated information in the grid
NOTE: Value and Description are not mandatory fields. User can leave both empty as well.
System Defaults
In System Defaults, user can edit the different default settings. User can edit and save
- Default workrule
- Default Absence Categories
- Default Period Group
- Default Holiday Schedule
- Default ESS Role
- Default Benefit Package
- Default Timezone
To update system defaults,
- Click on Admin icon
- Click on “Configuration page” option available under Admin menu
- Click on “System Settings” option under configuration page menu
4. Click on button “System Defaults” appearing at the top-right corner

- Clicking on the button “System Defaults” will open a side drawer
- User can update the single system default or all at once
- Once updates are made, button “Apply” will be enabled
- Click on “Apply”
- It will show the success toast message and save the updated info

NOTE: user can also save any of the system defaults value to “None”
——-
