
Synerion Agile is a workforce management system. This guide provides a high-level view of the tasks typically performed by a supervisor.
Supervisor Role Overview
The role of a Supervisor in the Synerion Agile system is to manage the day-to-day functions of the system as it pertains to their employees.
A supervisor’s tasks can include, but are not limited to:
On a daily basis:
- Review and fix records that require attention.
- Respond to pending absence requests.
On a pay period basis:
- Review and fix records that need attention.
- Review and signoff on employee’s pay period data.
On an ‘as needed’ basis:
- Maintain and adjust employee schedules.
- Run reports or other reporting data (Visual Pattern Tracker, Attendance Status, etc.).
To complete the above tasks, it is important that the supervisor be familiar with the following parts of the system:
Home screen
- See high-level pay period information and Signoff on Pay Period Records.
- See records and absence requests that require attention.
Timecard screen
- See details and correct any errors or exceptions in employee timecards.
- Code absences, pay extra time, change time categories as needed.
Period Signoff screen:
- See detailed pay period information for each employee.
- Signoff on multiple employees pay periods at once.
Absences screen:
- See detailed absence information for each employee.
- Add an absence for an employee.
Scheduling screen:
- View, create, modify or delete employee schedules.
- Copy scheduled from one day or employee to another, and into the future.
Work Rule Overview
Work Rules are the basis of the Synerion Agile system, and will tell the system how to calculate the employee’s time, whether they are early or late to work, whether they’re entitled to overtime, duration of their lunch break and whether it’s paid or unpaid, what premiums they are entitled to, etc.
There are 3 different types of work rules in the system, and which type is assigned to your employee depends largely on what kind of schedule they have.
A Weekly Work Rule is for employees who work the same schedule every week, and it doesn’t change. For example, an office worker will usually have a fixed schedule (for example, 9:00am to 5:00pm) every day.
A Scheduling Work Rule will be available in your system if you are licensed for it (please check with the system administrator). This type of work rule is for employees who have a different schedule from week to week, or work on a rotational basis.
Unlike the Weekly and Scheduling rules, in an Open Work Rule, there is no fixed start or end times. This type of work rule simply calculates the time between the in and out punches. This type of rule could be used for part-time employees who have no fixed schedule.
If an employee was assigned a Weekly or Open work rule, the schedule is applied automatically, and the supervisor does not have to create schedules for these employees. If the employee has been assigned a Scheduling work rule, the supervisor must maintain the schedules in the Schedules screen.
Navigation
Use the top bar to navigate to the various parts of the system.
The navigation menu with the three lines on the left side lets you access all the various tools and functions in the system.
The “Synerion” logo in the center will always bring you back to the Home page.
The account manager icon (top right of the screen), allows you to change your password, change notification settings, access your preferences, change the system’s language, upload a profile picture and log out from the system.

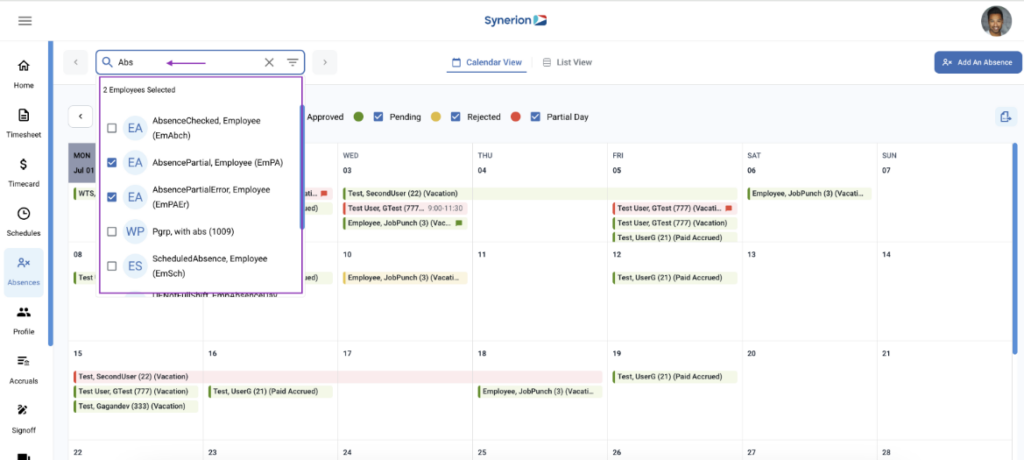
Employee Selector
The employee selector is found in most pages of the system, whenever you need to choose one or more employees. All employees visible to the current account will be automatically preloaded and selected, the number of preloaded employees will be shown in the selector
Typing an employee name or number into the search bar will allow you to quickly select that employee, or you can click on the search bar to select multiple employees. Optionally, you can filter by department, team, or other criteria by using the filter icon at the right of the search bar.
For more information about the Employee Selector, click HERE.
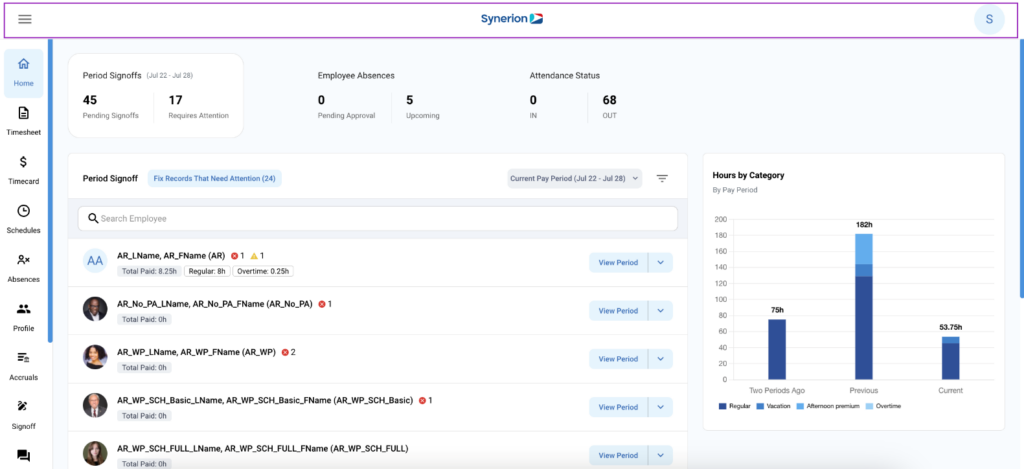
Home Page
The Home page serves as the main page of the system and displays an overview of information from the current pay period (not including the present day in progress). Here, you can do period signoffs, see records that need attention, see pending and upcoming absences, and see your employee’s attendance status for the day.
For more information about the Home Page (including Period Signoffs, Employee Absences and Attendance Status), click HERE.
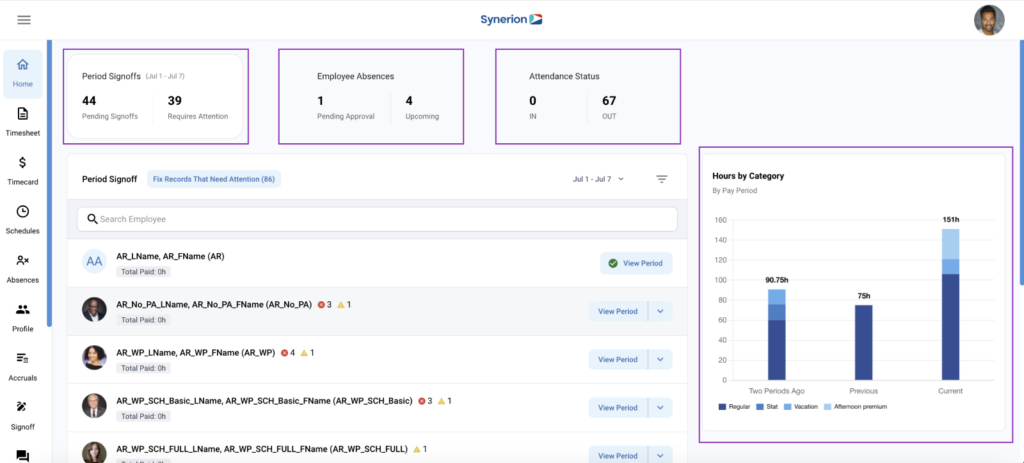
Period Signoffs
Employees pay periods must be signed off before being exported to payroll. A supervisor can sign off on their employee’s pay periods on the Home page towards the end or after the close of the pay period, or in the Period Signoff screen if they want to sign off on several employees at once. If the employee’s pay period contains an error, it must be corrected before the pay period is signed off.
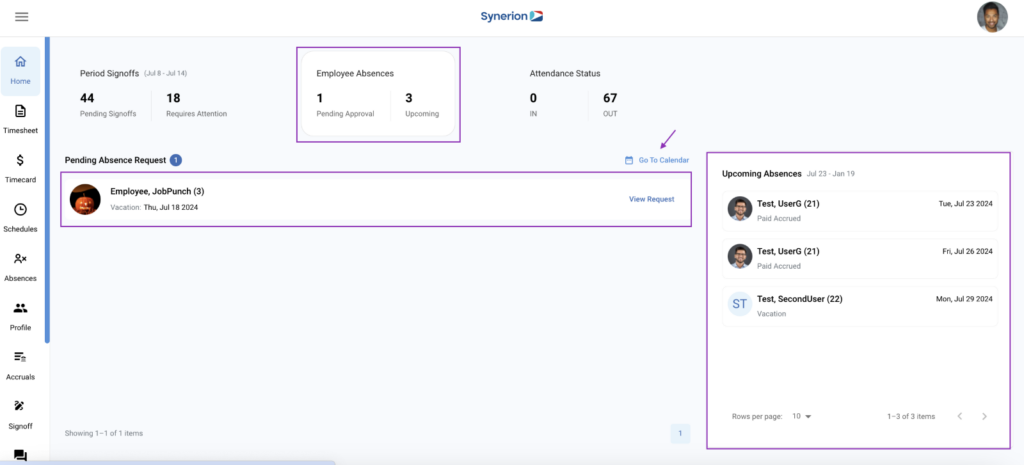
Employee Absences
The Employee Absences tab will show upcoming absences, as well as allowing you to view and action Pending absence requests. Click View Request to see the details of the absence request and check the employee’s accrual balance. Then Accept or Reject the absence request using the buttons at the bottom.
The Go To Calendar button will bring you to the absences calendar page where you can see employee’s absence details in a calendar or list view.
Attendance Status
The Attendance Status tab will display an employee’s attendance status depending on the last punch the system received.
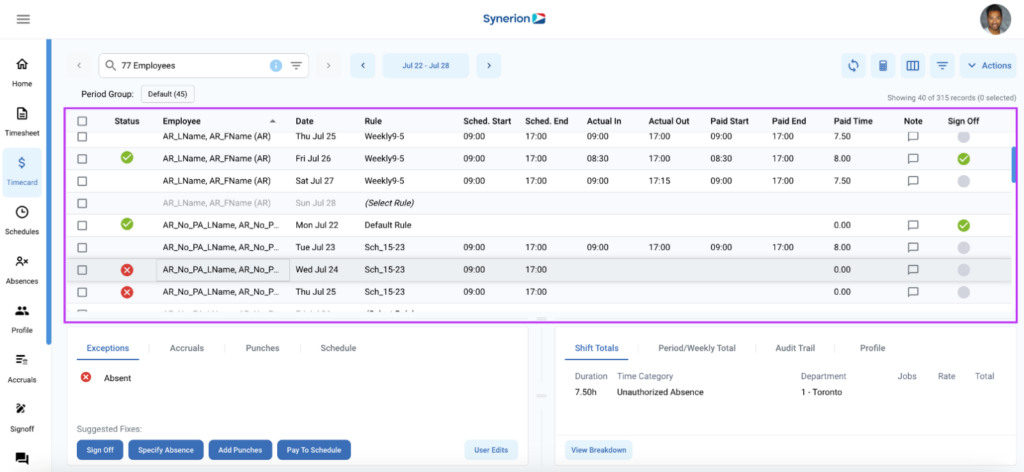
Timecard Editor – Overview
The Timecard is the main page of the application used to manage all daily time records for your employees. There are 3 main sections in the Timecard Editor.
- The Main Grid shows all pertinent information for the for an employee on a specific day, such as the work rule, the scheduled start and end, actual start and end, and paid start and end.
- The bottom left window will show you any errors or exceptions for the selected day and allow you to quickly fix them using Suggested Fixes. This window will also show you Accrual information for the employee and allow you to see or modify punches and schedules.
- The bottom right window will display daily or pay period totals, a detailed audit report of changes made to the day and allow quick access to the employee’s profile data
For a more detailed overview of the Timecard Editor, click HERE.
Timecard Editor – Edits and Approvals
Approving a Record
To approve a record, simply click the Sign Off option. You can Sign Off on a record by checking the circle icon in the Sign Off column in the Main Grid or in the suggested fixes in the Exceptions tab. If you want to sign off on more than one record at a time, use the Sign Off button in the Actions menu at the top right of the screen.
This will add the green checkmark to the day in the status column, indicating that you’ve looked at it and no further changes are needed. Easily see which days have already been dealt with, and which ones still need attention. 
Editing a Record
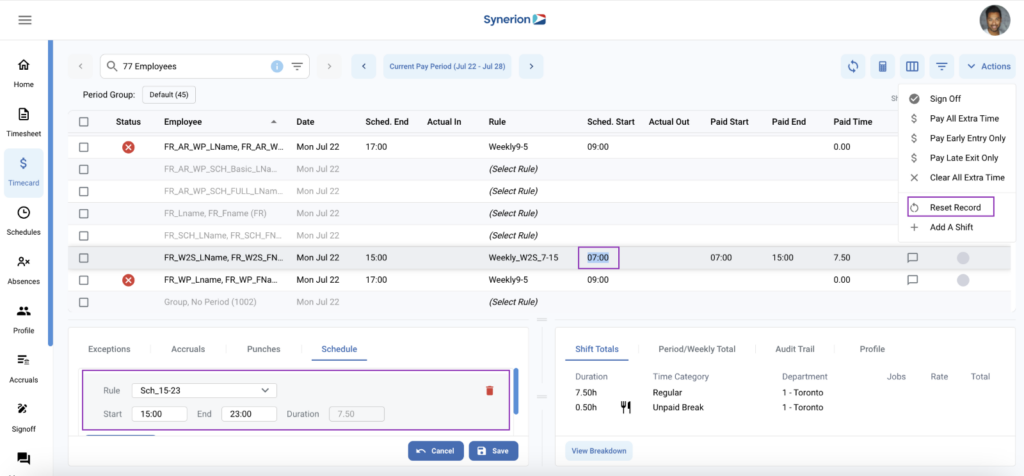
Edits can be made to the work rule, Scheduled Start/End, Actual In/Out, and Paid Start/End directly in the Main Grid simply by clicking on the field you want to edit. The lower left Actions window can also be used to quickly fix errors and exceptions, add/edit punches or changing the work rule or schedule.
Once you’ve made your changes, you can save and recalculate the record in three ways – press Enter, Tab to the end of the record, or click on another row.
Use the Reset Record button in the Actions menu to remove any edits you’ve saved and start over. Punches will remain as is, but other edits will be removed.
For more information about Edits and Approvals in the Timecard Editor (including what to do in case of an Unauthorized Absence, Paying Extra Time, Punch Modifications, and User Edits), click HERE.
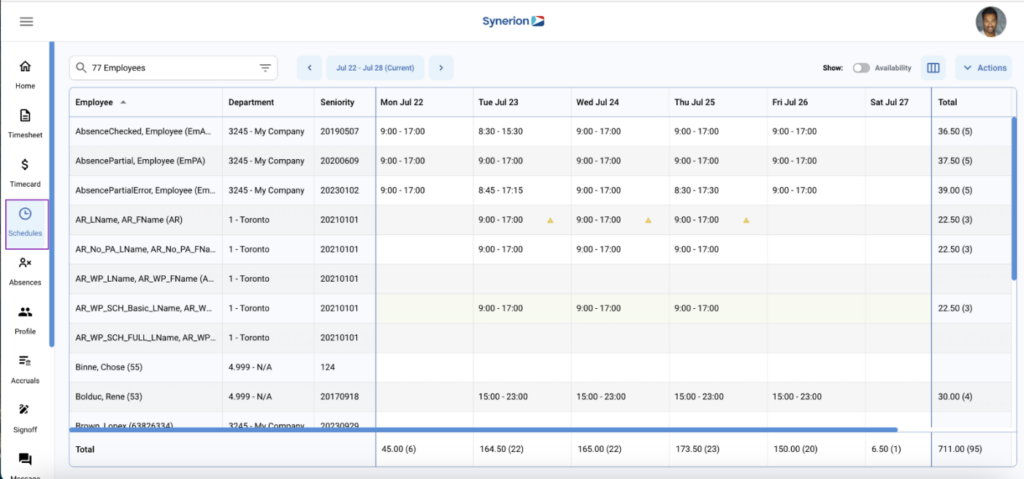
Employee Schedules – Overview
(Optional – if you’re licensed for the Employee Scheduler)
This is the main tool used to manage employee schedules. An employee’s schedule tells the system which day they are working, at what times, using which work rules, in which departments, and potentially on what jobs. With all that information, the system can now compare the employee’s punch activity and let you know if they were absent, if they came in late, if they worked extra time, if they took a long break, which premiums they are entitled to, etc.
Editing a schedule
To simply edit the start or end times of an employee’s schedule, double click the cell on the grid corresponding to the day and employee whose schedule you want to edit. Once you’ve made your changes, you can save the schedule in three ways – press Enter, Tab to the end of the record, or click on another cell.
For more complex schedule edits, click on the 3 dots to the right of the cell you want to change and select Edit Schedule. The side panel will open from the right and will allow you to specify an absence, change the work rule or schedule, or add costing information or an additional shift.

Copying Schedules
There are several ways to copy a single schedule from one day to another. In the grid, use CTRL-C to copy, and CTRL-V to paste the schedule. You can also drag and drop the schedule to the new day or new employee, or click on the 3 dots to the right of the cell you want to copy and select Copy Schedule. Then repeat on the cell you want to copy the schedule to and click Paste Schedule.
Copying Schedules Forward
The Mass Copy function will copy the schedules of all employees visible in the grid forward, and each iteration will depend on the date range chosen (7 days, 14 days, etc.)
For more information on Employee Schedules, including detailed instructions on Editing and Copying schedules, click HERE.
Employee Profile
The Employee Profile screen will display the information pertinent to your employee such as their employee code, hire date, department, contact information, and more. You can access the Employee Profile by navigating from the menu on the left side of the screen, or you can see a specific employee’s profile directly from the Profile tab in the lower right Details window in the Timecard Editor.
For more information about the Employee Profile screen, click HERE.