About Synerion Agile
Synerion Agile is a workforce management system. This guide covers the functions and tasks typically performed by an administrator.
Administrator Role Overview
The role of an administrator in the Synerion Agile system is essentially to manage employee profile data, run the pay period end process, and perform routine maintenance of the system. Administrators also have access to all supervisor functions in case they need to act as a supervisors as well. The supervisor quick start guide can be found HERE.
An administrator’s tasks can include, but are not limited to:
On a pay period basis:
- Review and confirm the signoff on the employee’s pay period data
- Generate the payroll export file
On an ‘as needed’ basis:
- Maintain employee data (add new employees, deactivate old employees)
- Run reports or other reporting data (Attendance Status, etc.)
On a yearly basis:
- Review and adjust holiday calendars
To complete the above tasks, the administrator must be familiar with the following parts of the system:
- Employee Profile screen:
- View, add, modify, or inactivate employees in the system
- Assign or change work rules, benefit packages or other information assigned to the employee
- Period Signoff screen:
- See detailed pay period information for each employee
- Review and confirm that all employee’s pay periods are signed off
- Payroll Export screen:
- Generate the formatted payroll export file to be imported into the payroll system
- Reporting/Attendance Status screens:
- Run Reports, see whether employees are in or out based on the last punch in the system
- Holidays screen:
- Add/edit/delete holidays that are configured in the system
Navigation
Use the top bar to navigate to the various parts of the system.
- The navigation menu with the three lines on the left side lets you access all the various tools and functions in the system
- The “Synerion” logo in the center will always bring you back to the Home page
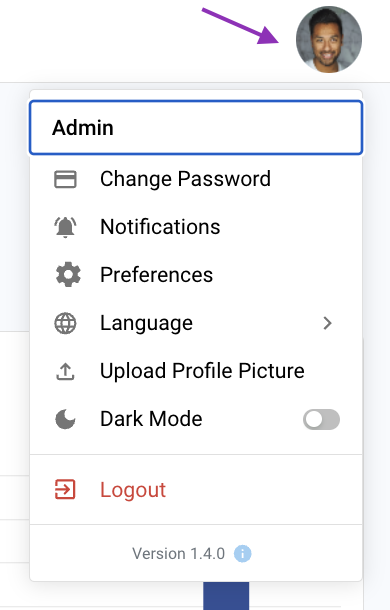
- The account manager icon (top right of the screen), allows you to change your password, change notification settings, access your preferences, change the language of the system, upload a profile picture and log out from the system
Employee Profile
The Employee Profile can be found by navigating from the menu on the left side of the screen, or you can see a specific employee’s profile directly from the Profile tab in the lower right Details window in the Timecard Editor.
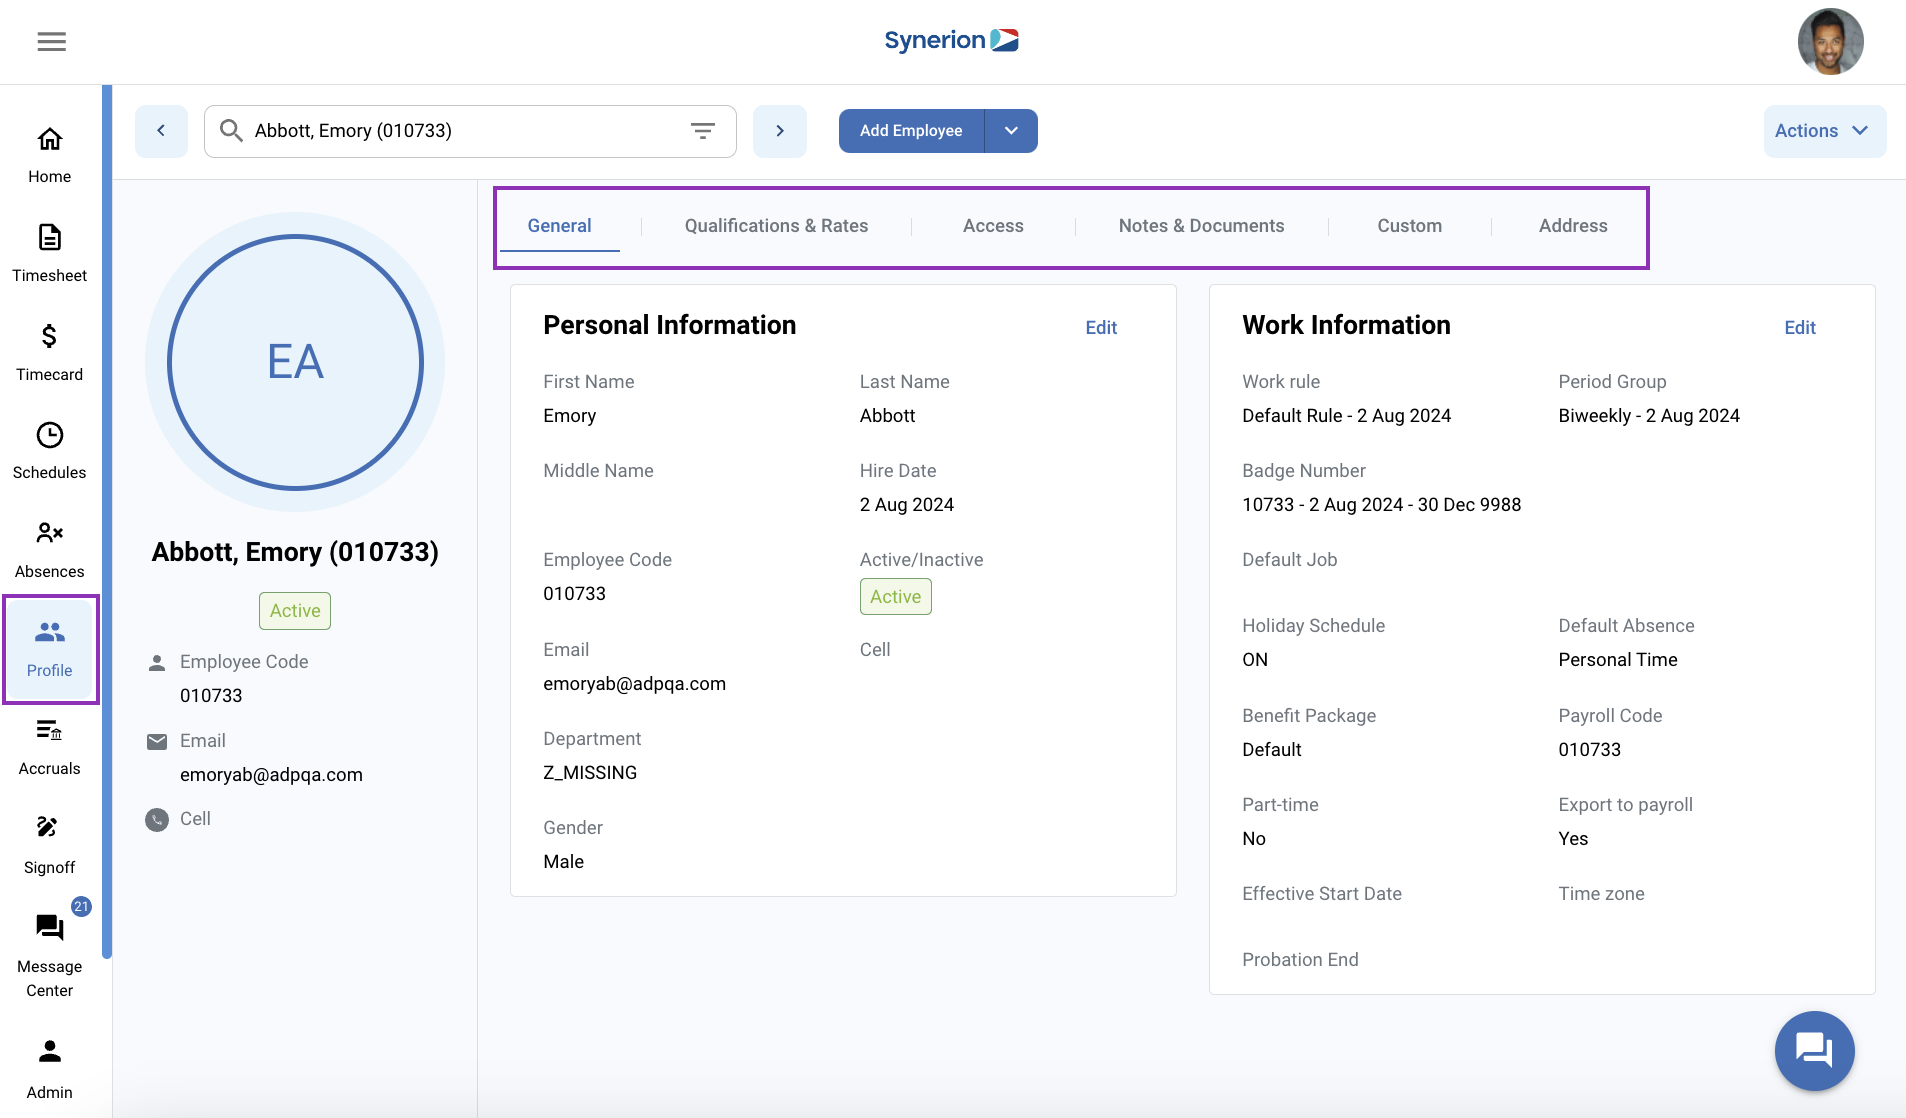
The General tab in the Employee Profile screen will give you basic information about the employee, such as their status (active or inactive), their cell phone number or email address if it exists in the system, their hire date and what department they’re in. It will also show other pertinent information like their assigned Work Rule, Period Group, Badge Number, Holiday Schedule, and Benefit package.
The Qualifications & Rates tab will show any qualifications assigned to the employee, as well as any rate, department rate, or job rate for that employee.
The Access tab will show information about how the employee can access the system. The Clock window will show any additional roles assigned on the clock, as well as how the employee is verifying themselves on the clock. If the employee has an ESS account, that information is shown in the Application Access tab. This includes their username, ESS language, who has visibility to that employee as well as their absence request approver and security role. The employee’s ESS password can be changed on this screen by clicking the Change Password button.
The Notes & Documents tab will allow an administrator to attach documents or write notes in the employee’s profile.
The Address tab is used for personal and corporate addresses and other personal information such as birthdays and phone numbers.
Adding an Employee
Employees can be added using the Add Employee button at the top of the screen. When adding an employee, a sidebar will appear where the employee information can be entered. Once the required information has been entered, the administrator can choose to Apply and Close the sidebar, or Apply and Add Another to create another employee.
To duplicate an existing employee, click on the arrow on the right side of the Add Employee button and select Duplicate Employee. A window will open to allow the administrator to select the employee to duplicate and some fields to enter the name, employee code, and hire date of the new employee. All other information (department, work rule, etc.) will be duplicated from the original employee.
If your system is configured to integrate with one of our Integration Partners (such as ADP Vantage and Workforce Now, BambooHR, EmployerD or Nethris), employees will be synced from that system and created automatically in your Agile system.
Period Signoffs
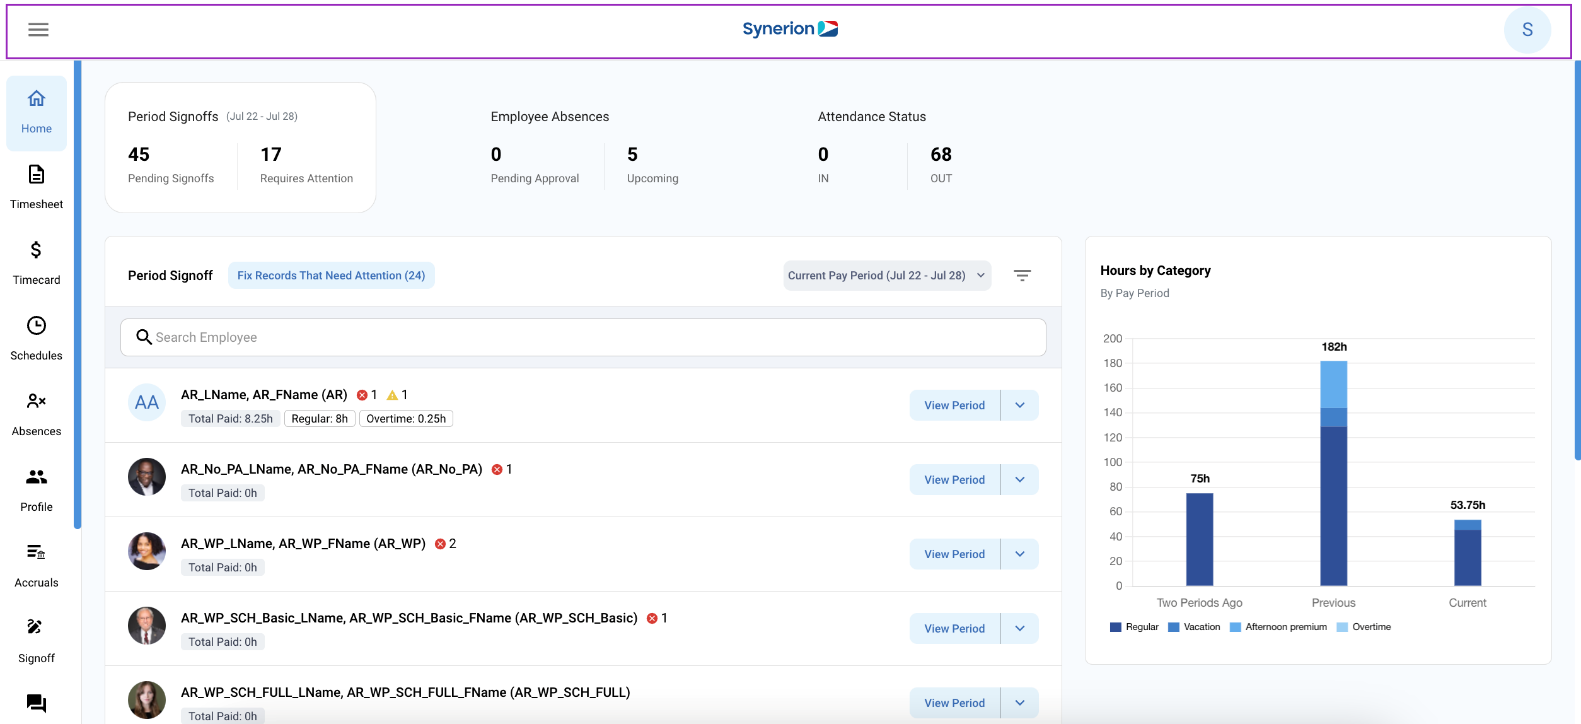
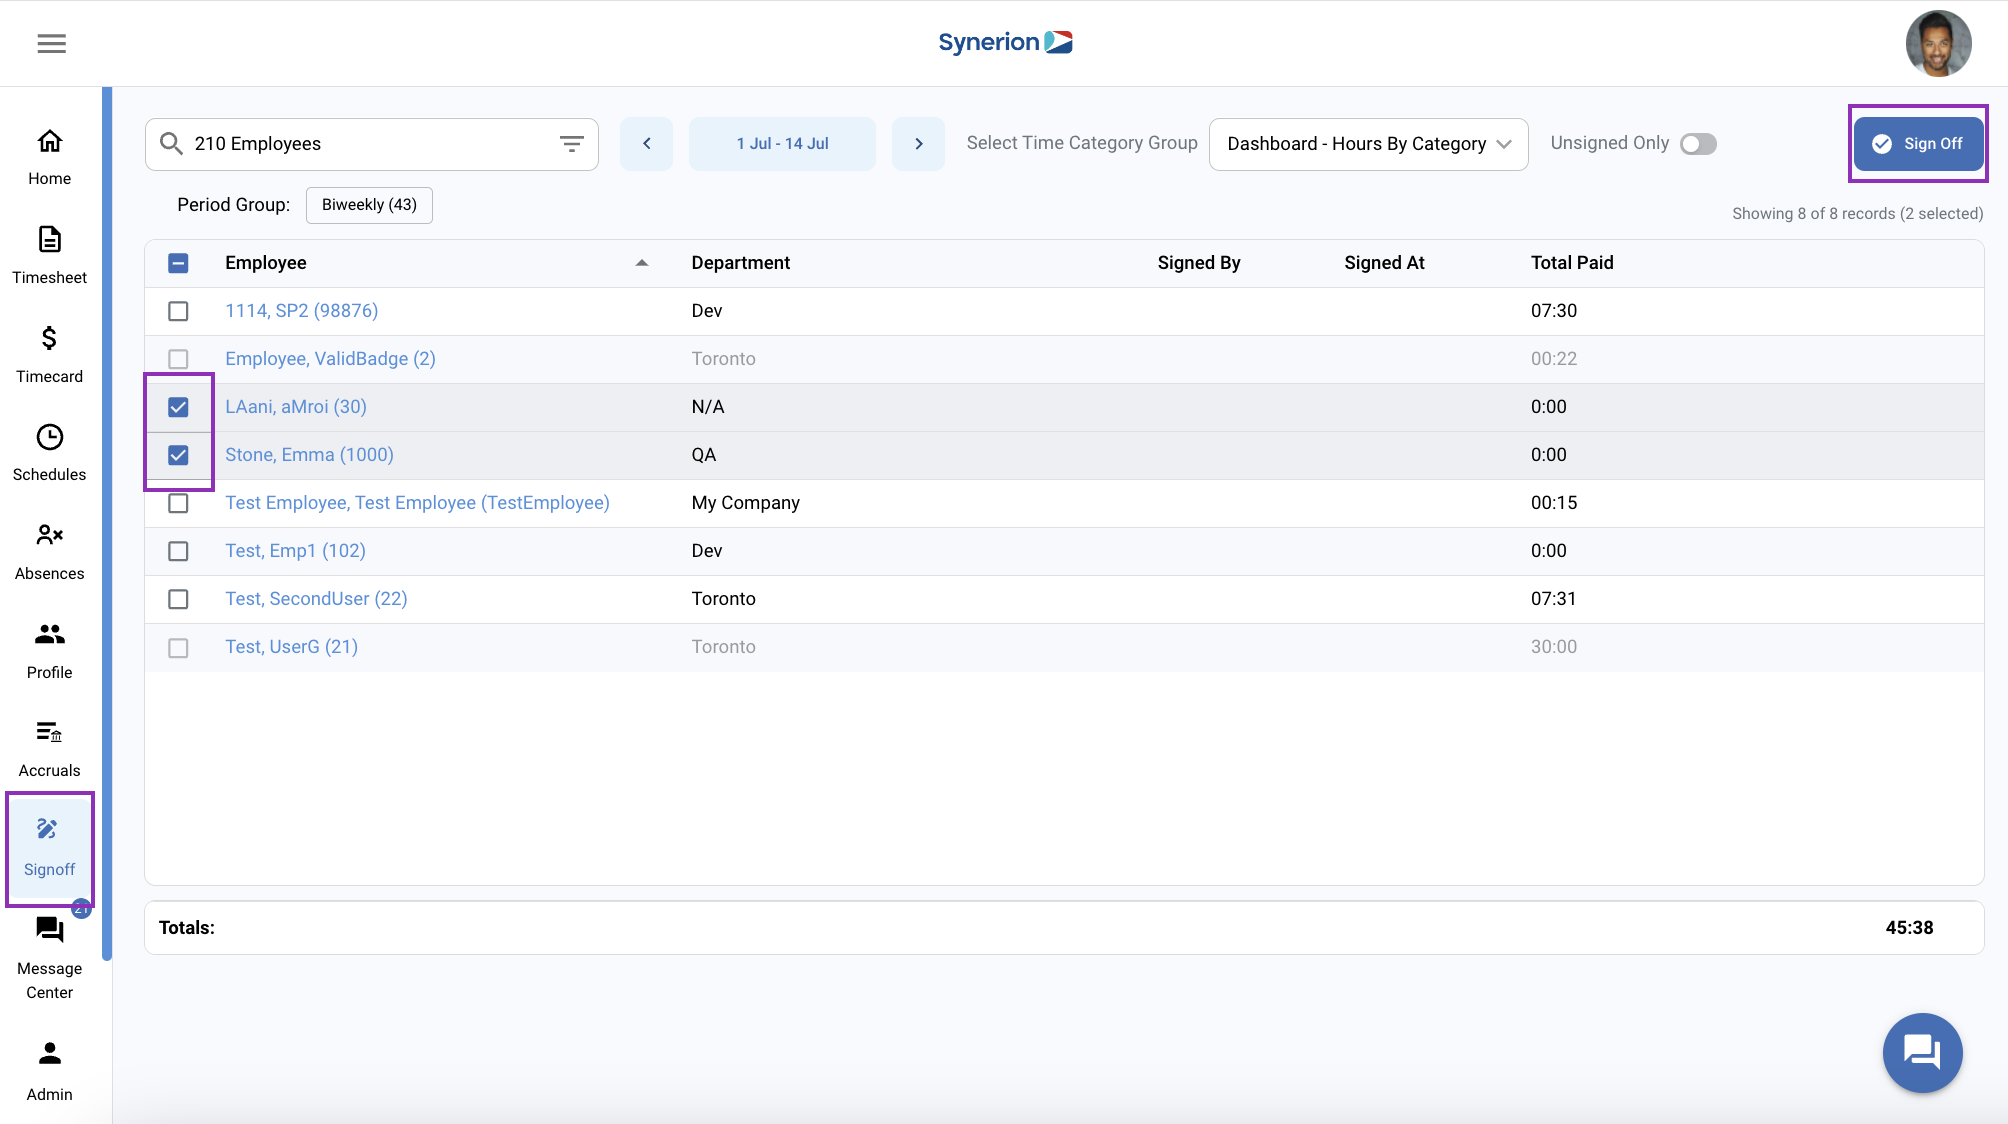
Employees’ pay periods must be signed off before being exported to payroll. Typically, the supervisor will sign off on their employee’s pay period records. An administrator should review the signoffs before exporting pay period data to the payroll provider.
Payroll Export
The payroll export should be performed at the end of the pay period, once all employee records have been signed off. The payroll export process will generate a formatted file that can be imported into the payroll software. Once the pay period has been signed off, no further changes should be necessary to the payroll export file.
Holiday Calendar
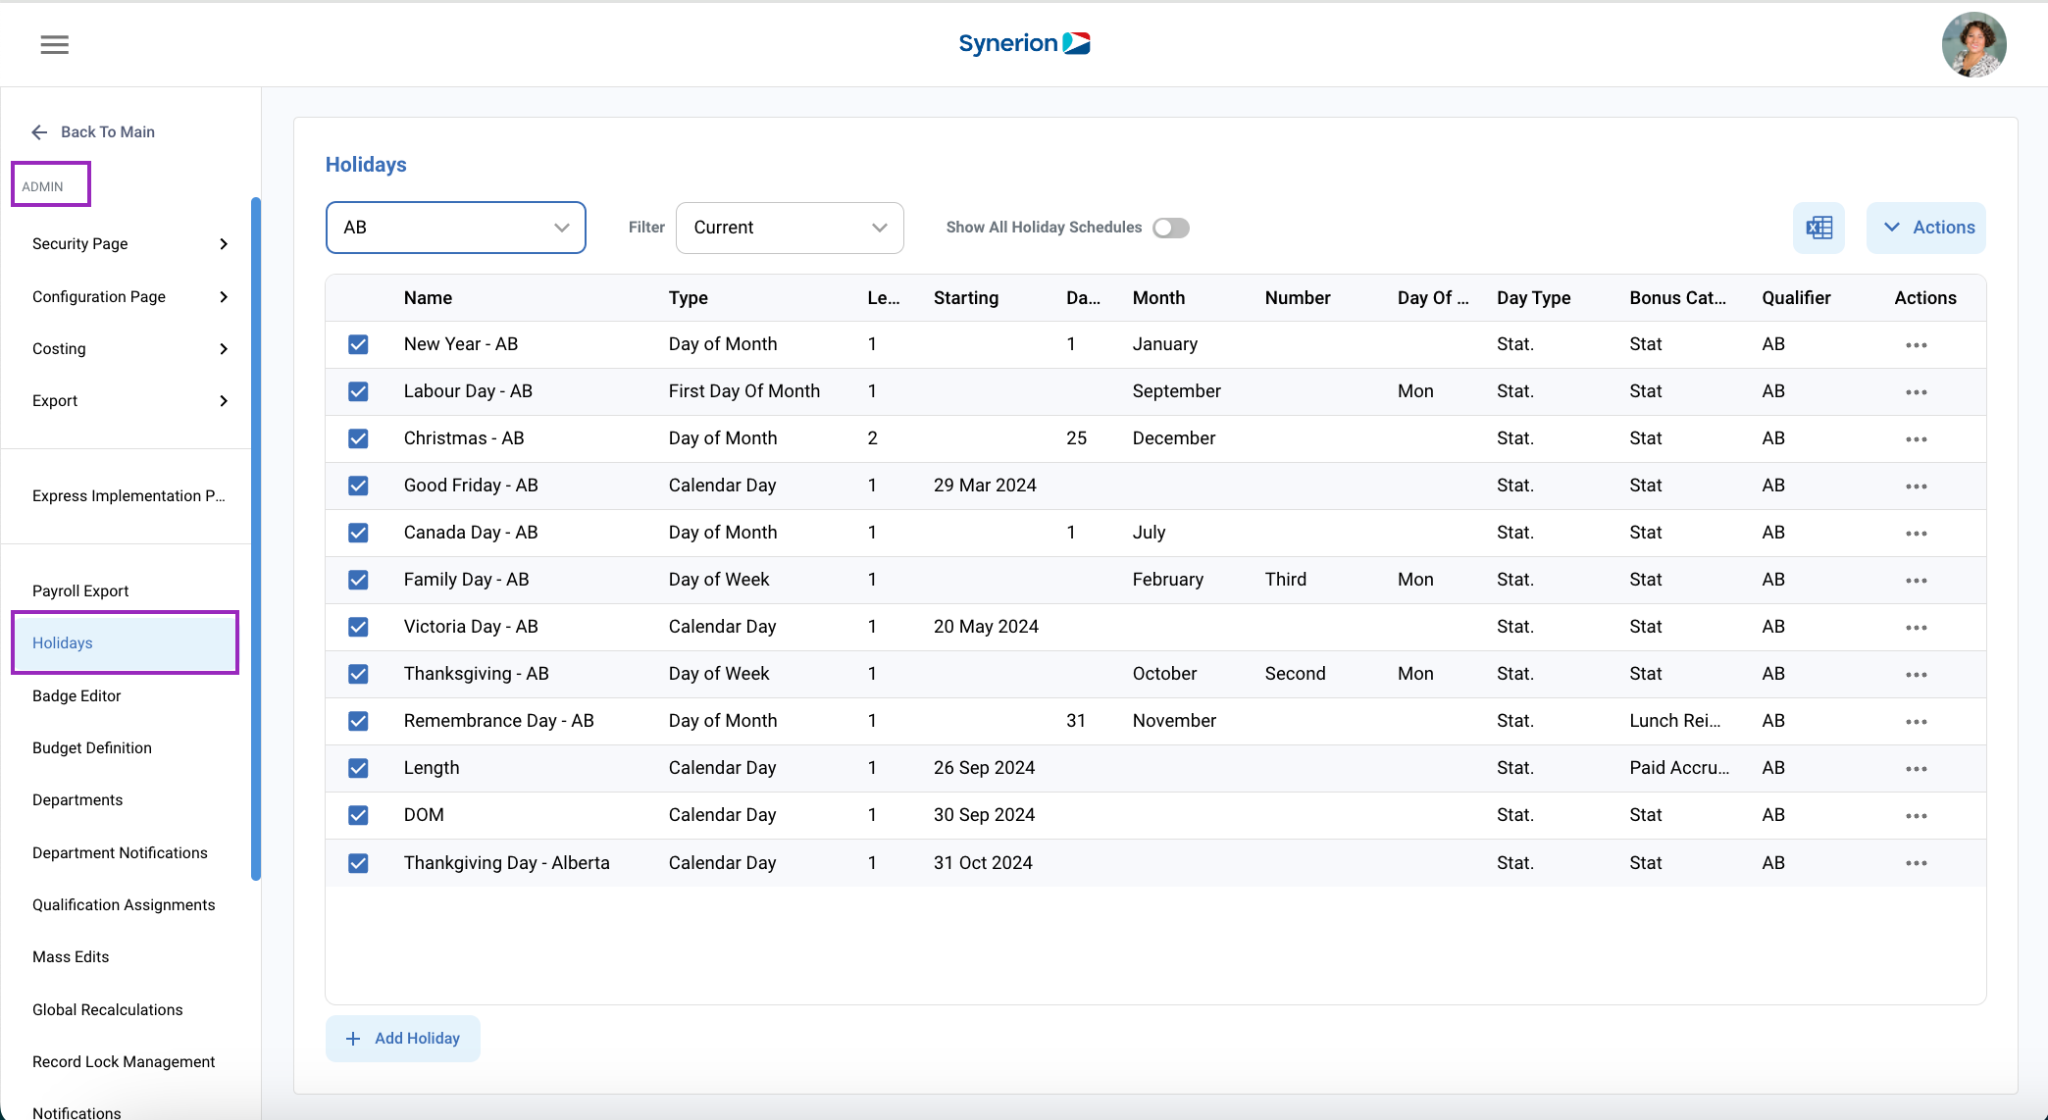
The Holidays screen defines what days of the year are considered holidays in the system. This screen can be found in the Admin menu of the system.
Several different types of holidays can be configured:
Calendar Day – This type of holiday will be used for holidays that fall on different calendar days every year. The Starting date is the date that the holiday falls on. Example: In Canada, Good Friday falls on a different day every year
Day of Month – This type of holiday is used for holidays that fall on the same day every year. The Day of the Month and Month must be specified. Example: New Year’s Day always falls on January 1st
Day of Week – This type of holiday is used for holidays that always fall on the same day and week every year. The Month, Number (week) and Day of the Week must be specified. Example: In the US, Thanksgiving always falls on the fourth Thursday in November
First Day of Month – This type of holiday is used for holidays that always fall on the same day in the first week of the month. The Month and Day of the Week must be specified. Example: Labor Day always falls on the first Monday in September
A holiday can be deactivated using the checkbox on the left, deleted using the Trash Can icon on the right, or edited using the pencil icon on the right.
Accrual Summary
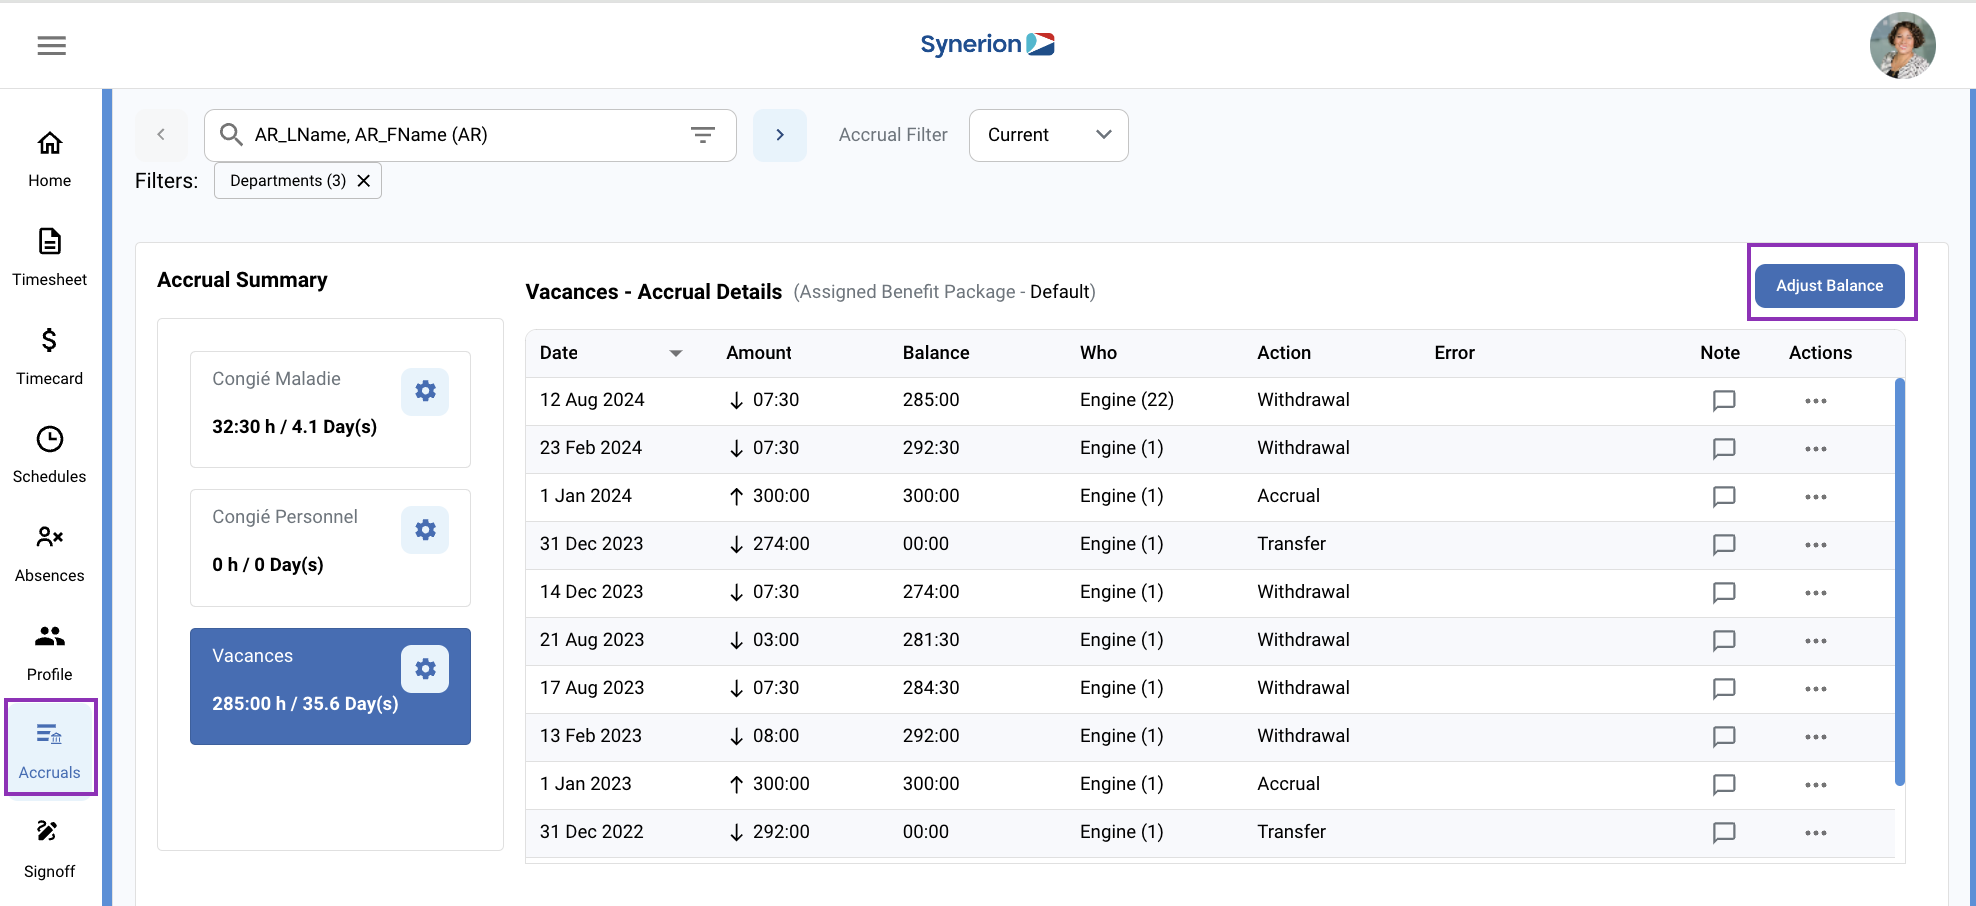
The Accrual Summary page will allow an administrator to see the details of the Accrual Package assigned to the employee. The details can be filtered using the Accrual Filter dropdown to see details of the Current, Past or All accrual periods.
Any Accrual Plans will be displayed on the left (such as Vacation and Sick, or PTO), and will show the current remaining balance.
Transactions in the selected plan will be shown in the Accrual Details window. Added time will appear with an up arrow, and used or removed time will be shown with a down arrow. Other details are shown here, such as the date of the transaction, the balance of the transaction, who submitted the transaction, and if there are any errors or notes attached to the transaction.
Balances can be adjusted manually using the Adjust Balance button at the top right, and manual transactions can be deleted using the 3-dots (…) button under the Actions column.
Any approved future absences for the employee will be shown in the Future Absences window at the bottom of the screen. If the employee has any future absences planned, a Calculate Future Balances button will appear that will allow the administrator to show the remaining balance as of the day after the last planned absence.
Express Implementation Portal
The Express Implementation Portal is the configuration section of the Synerion Agile system. An administrator will have access to the Portal which will allow them to add, edit, or view different parts of the system configuration, including Departments, Time Categories, Pay Periods, Work Rules, Accruals, and Notifications, among other things. Care should be taken when in the Portal, as any changes made will affect calculations in the system. Our support team is always available to assist with any required changes and can be reached by email at agilesupport@synerion.com or by phone
1-877-816-8463,ext. 5.
User Manager
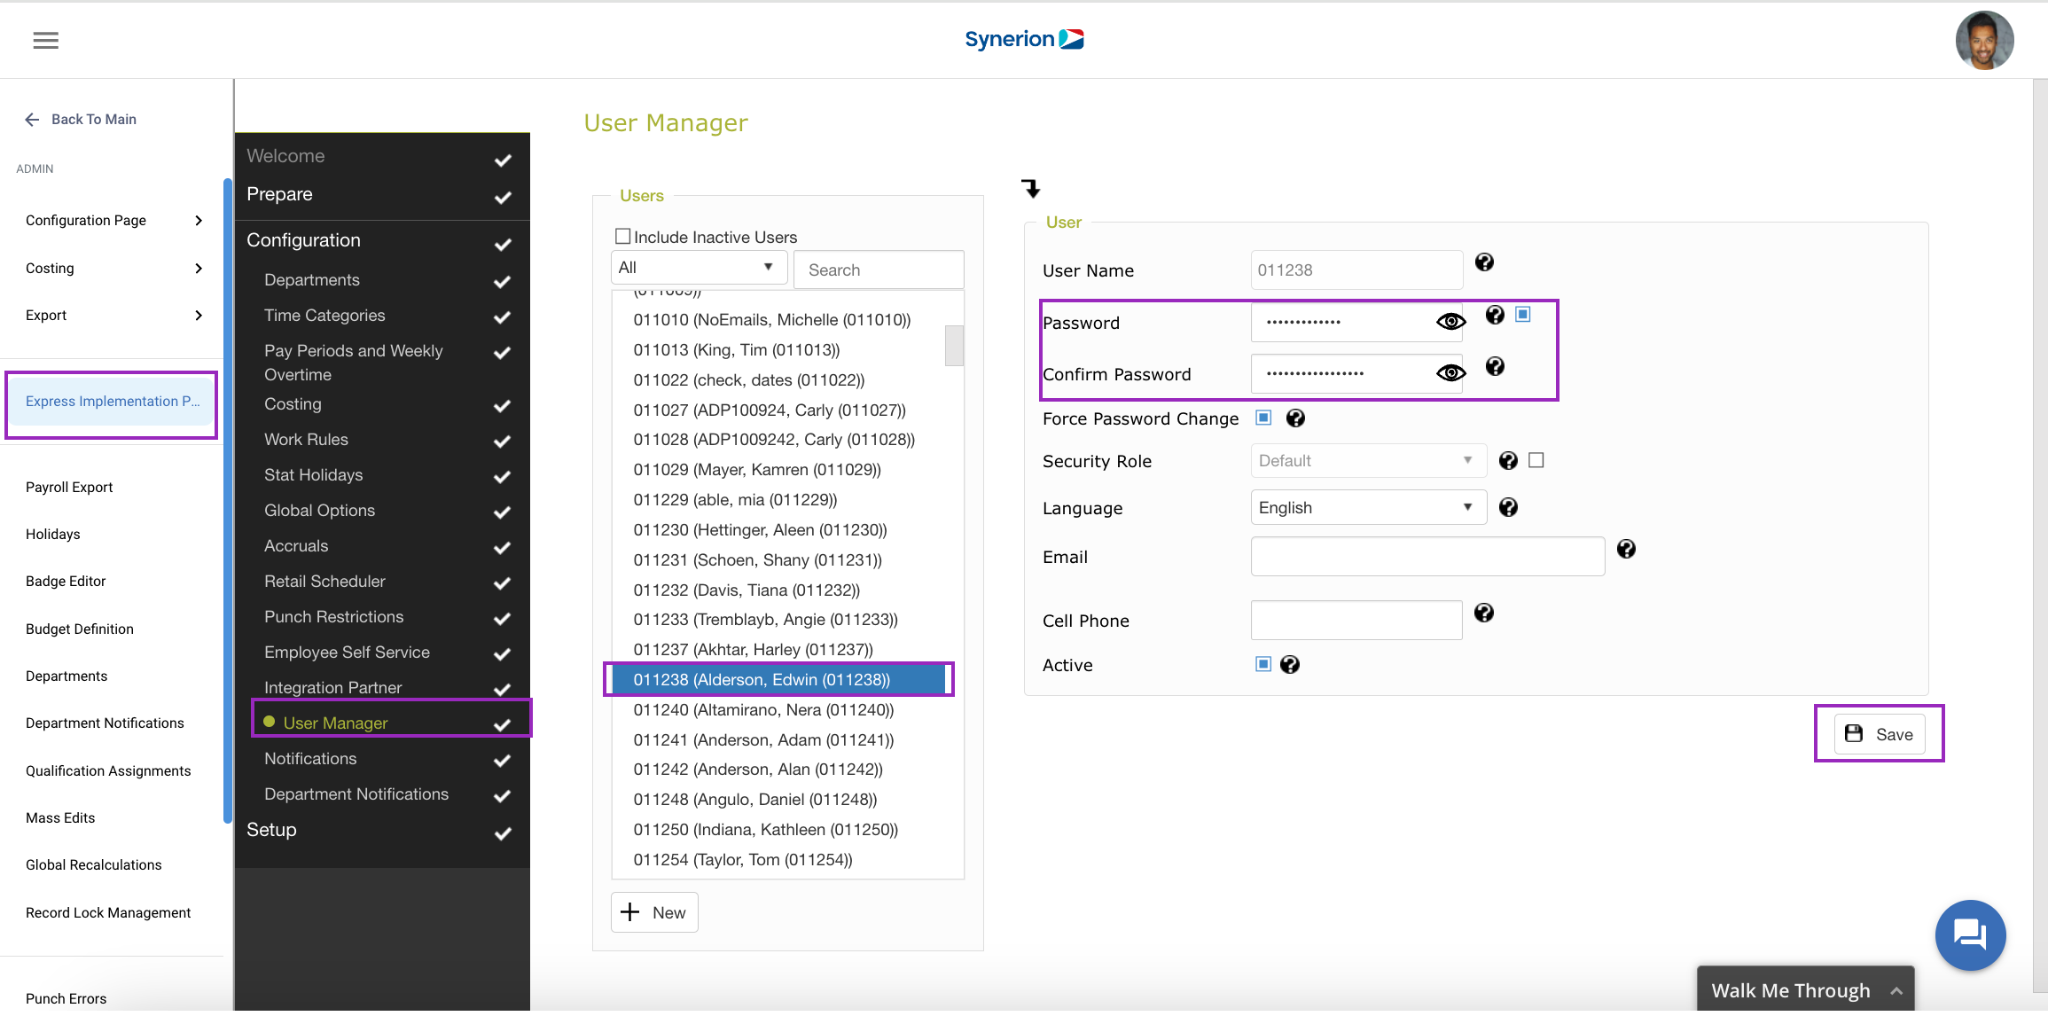
The User Manager is a tab in the Portal that can be used by an administrator to create new supervisor or administrator accounts and reset passwords as required.
Resetting a password
First, find the account using the Search field at the top of the Users window. The list can also be filtered using the dropdown menu to show All users, Administrators only, Supervisors only, Admins and Supervisors, or Employee Self-serve (ESS) users. Inactive users will show in red if the Include Inactive Users checkbox is selected.
Select the account whose password needs to be reset. Unlock the Password field by clicking on the checkbox to the right of the Password field. Enter the desired password, and then confirm it by typing the identical password into the Confirm Password field below. Clicking the Force Password Change checkbox will require the user to reset their password immediately upon login with the new password.
By default, password complexity rules are enforced in the system. The password must contain at least one uppercase character, one lowercase character, and one number, and must be at least 8 characters in length. Sequential numbers, usernames and the employee’s first and last name are also not allowed for security purposes.
Click the Save button at the bottom right to save the new password.
Adding a User
To add a user, click the +New button at the bottom of the User selector. Enter the desired username and password (and confirm the password), and select whether the user needs to change their password when they first log in using the Force Password Change checkbox. Choose the Role of the new user (typically either Admin or Supervisor), and enter the user’s email address that will be used for notifications. Cell phone number is optional.
Finally, if creating a supervisor user, select which departments will be visible to the supervisor using the department visibility window at the bottom of the screen.
Once all the information has been filled out, save the new user using the Save button.
If more user licenses are required, please reach out to your salesperson to have additional licenses added.
Useful Links
Please use the links to our Help site for more information on the following topics:

